A supersaturated solution is unstable—it contains more solute (in this case, sugar) than can stay in solution—so as the temperature decreases, the sugar comes out of the solution, forming crystals. The lower the temperature, the more molecules join the sugar crystals, and that is how rock candy is created.
 Here is an easy recipe for you: Heat a cup of water in a saucepan until it boils, add three cups of sugar, and stir with a spoon. Then pour the solution into a glass jar. Dangle a wooden stick into the syrup, and leave it for a few days. When you return, you will find… rock candy.
Rock candy has a unique texture. It is made of large chunks of flavored sugar that you can crunch in your mouth. Other candies come in a variety of textures: chewy (fudge), gritty (cotton candy), or hard (glass candy).
Given that candies are all made with sugar, what causes their textures to be so different?
Rock candy
To make most types of candies, you always start by dissolving sugar in boiling water. This forms a sugar syrup, which you can cool down by taking it off the burner. But how you cool down the syrup can make all the difference.
The main difference between these different types of candies is whether sugar crystals form and, if so, what their size is. So how do sugar crystals form, and what causes them to have different sizes when the syrup is cooled down?
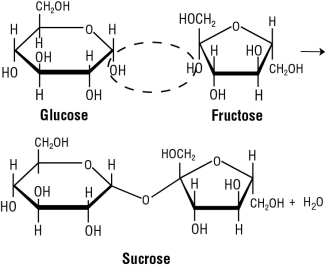
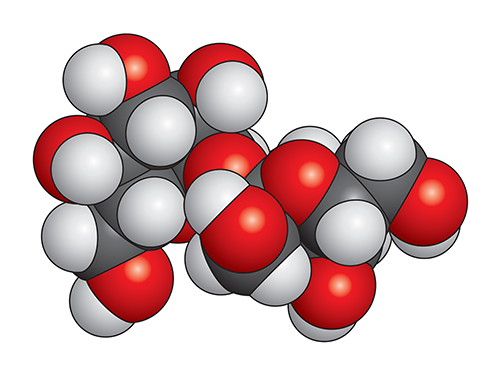
Let’s assume we can see sugar at the molecular level. Each grain of sugar consists of a small crystal made of an orderly arrangement of molecules called sucrose. Sucrose is an example of a carbohydrate. The basic unit of a carbohydrate is a monosaccharide or simple sugar—such as glucose or fructose (Fig. 1). These simple sugars can be linked together in infinite ways. Sucrose is a disaccharide made up of glucose and fructose (Fig. 1 and Fig. 2).
Sucrose Molecule
Click image to enlarge
Click image to enlarge
In a sugar crystal, the sucrose molecules are arranged in a repeating pattern that extends in all three dimensions, and all of these molecules are attracted to each other by intermolecular forces—a type of interaction that binds molecules together and is weaker than the bonds between atoms in a molecule.
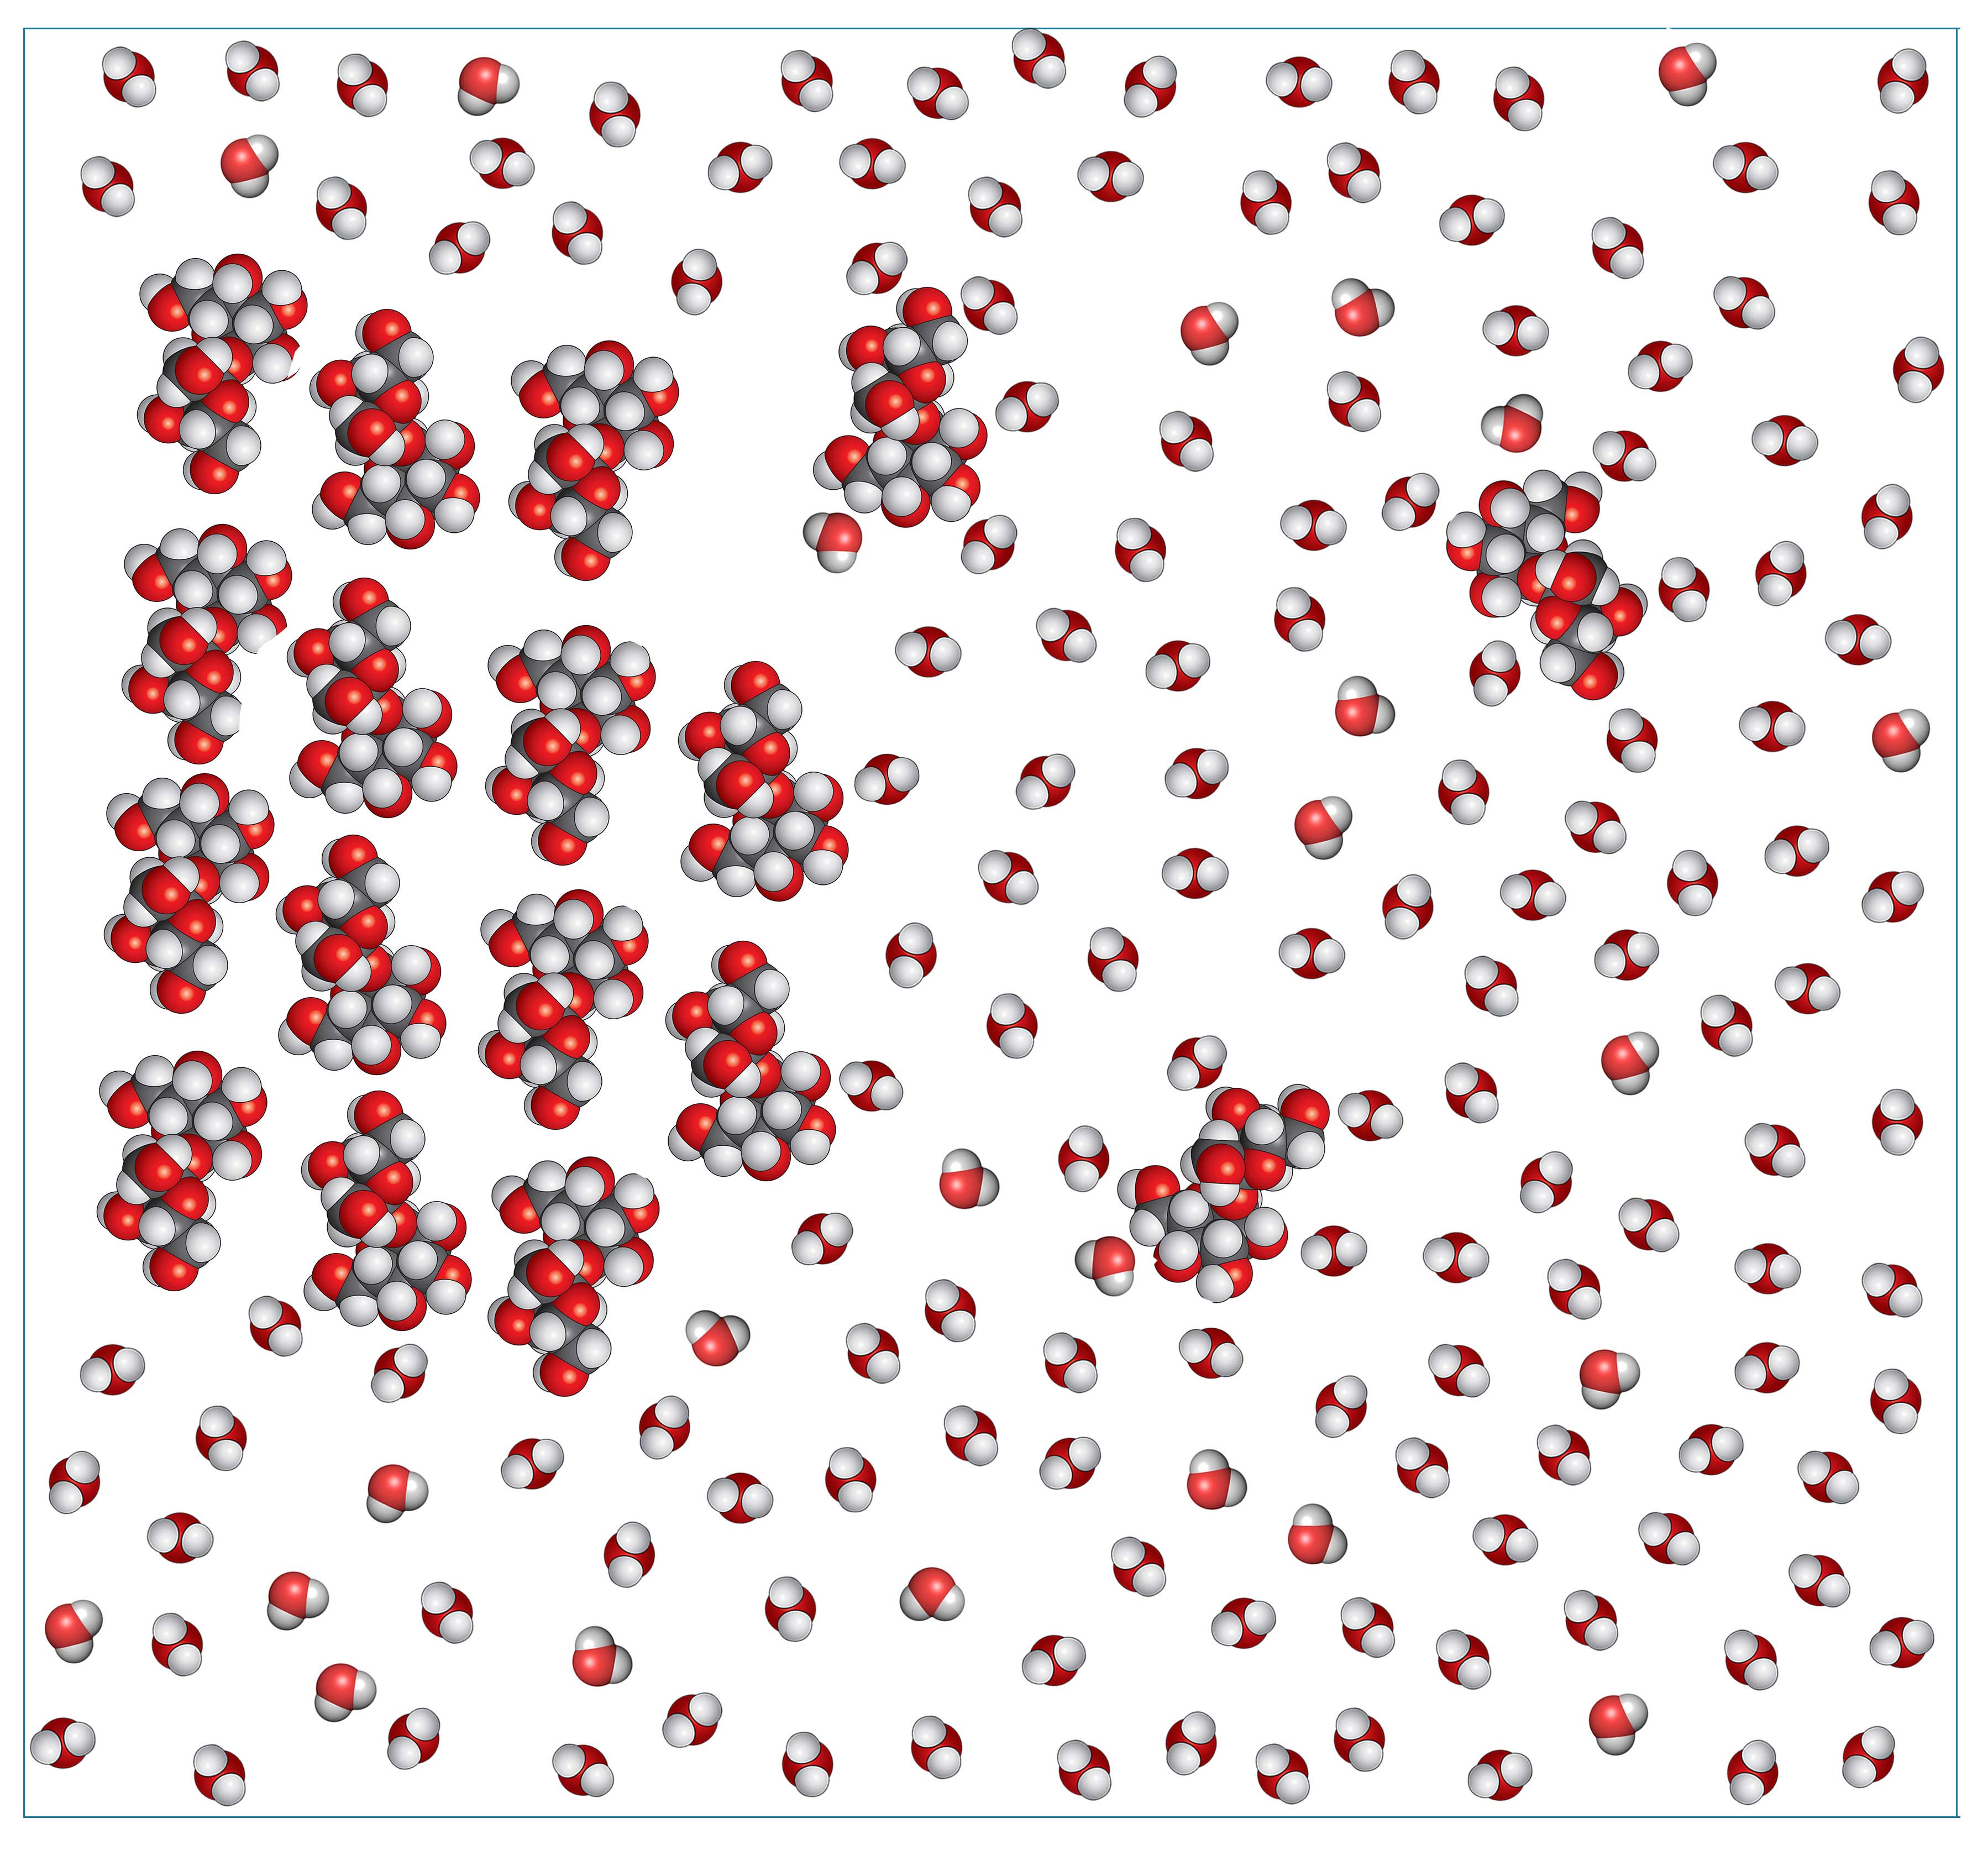
When you add granulated sugar to water, some of the sucrose molecules start separating from one another because they are attracted to the water molecules (Fig. 3). When water and sucrose molecules are close to each other, they interact through intermolecular forces that are similar to the intermolecular forces between sucrose molecules.
Click image to enlarge
The dissolving process involves two steps: First, the water molecules bind to the sucrose molecules; and second, the water molecules pull the sucrose molecules away from the crystal and into the solution.
In general, only a certain amount of a solid can be dissolved in water at a given volume and temperature. If we add more than that amount, no more of that solid will dissolve. At this stage, we say that the solution is saturated. The additional solid just falls to the bottom of the container.
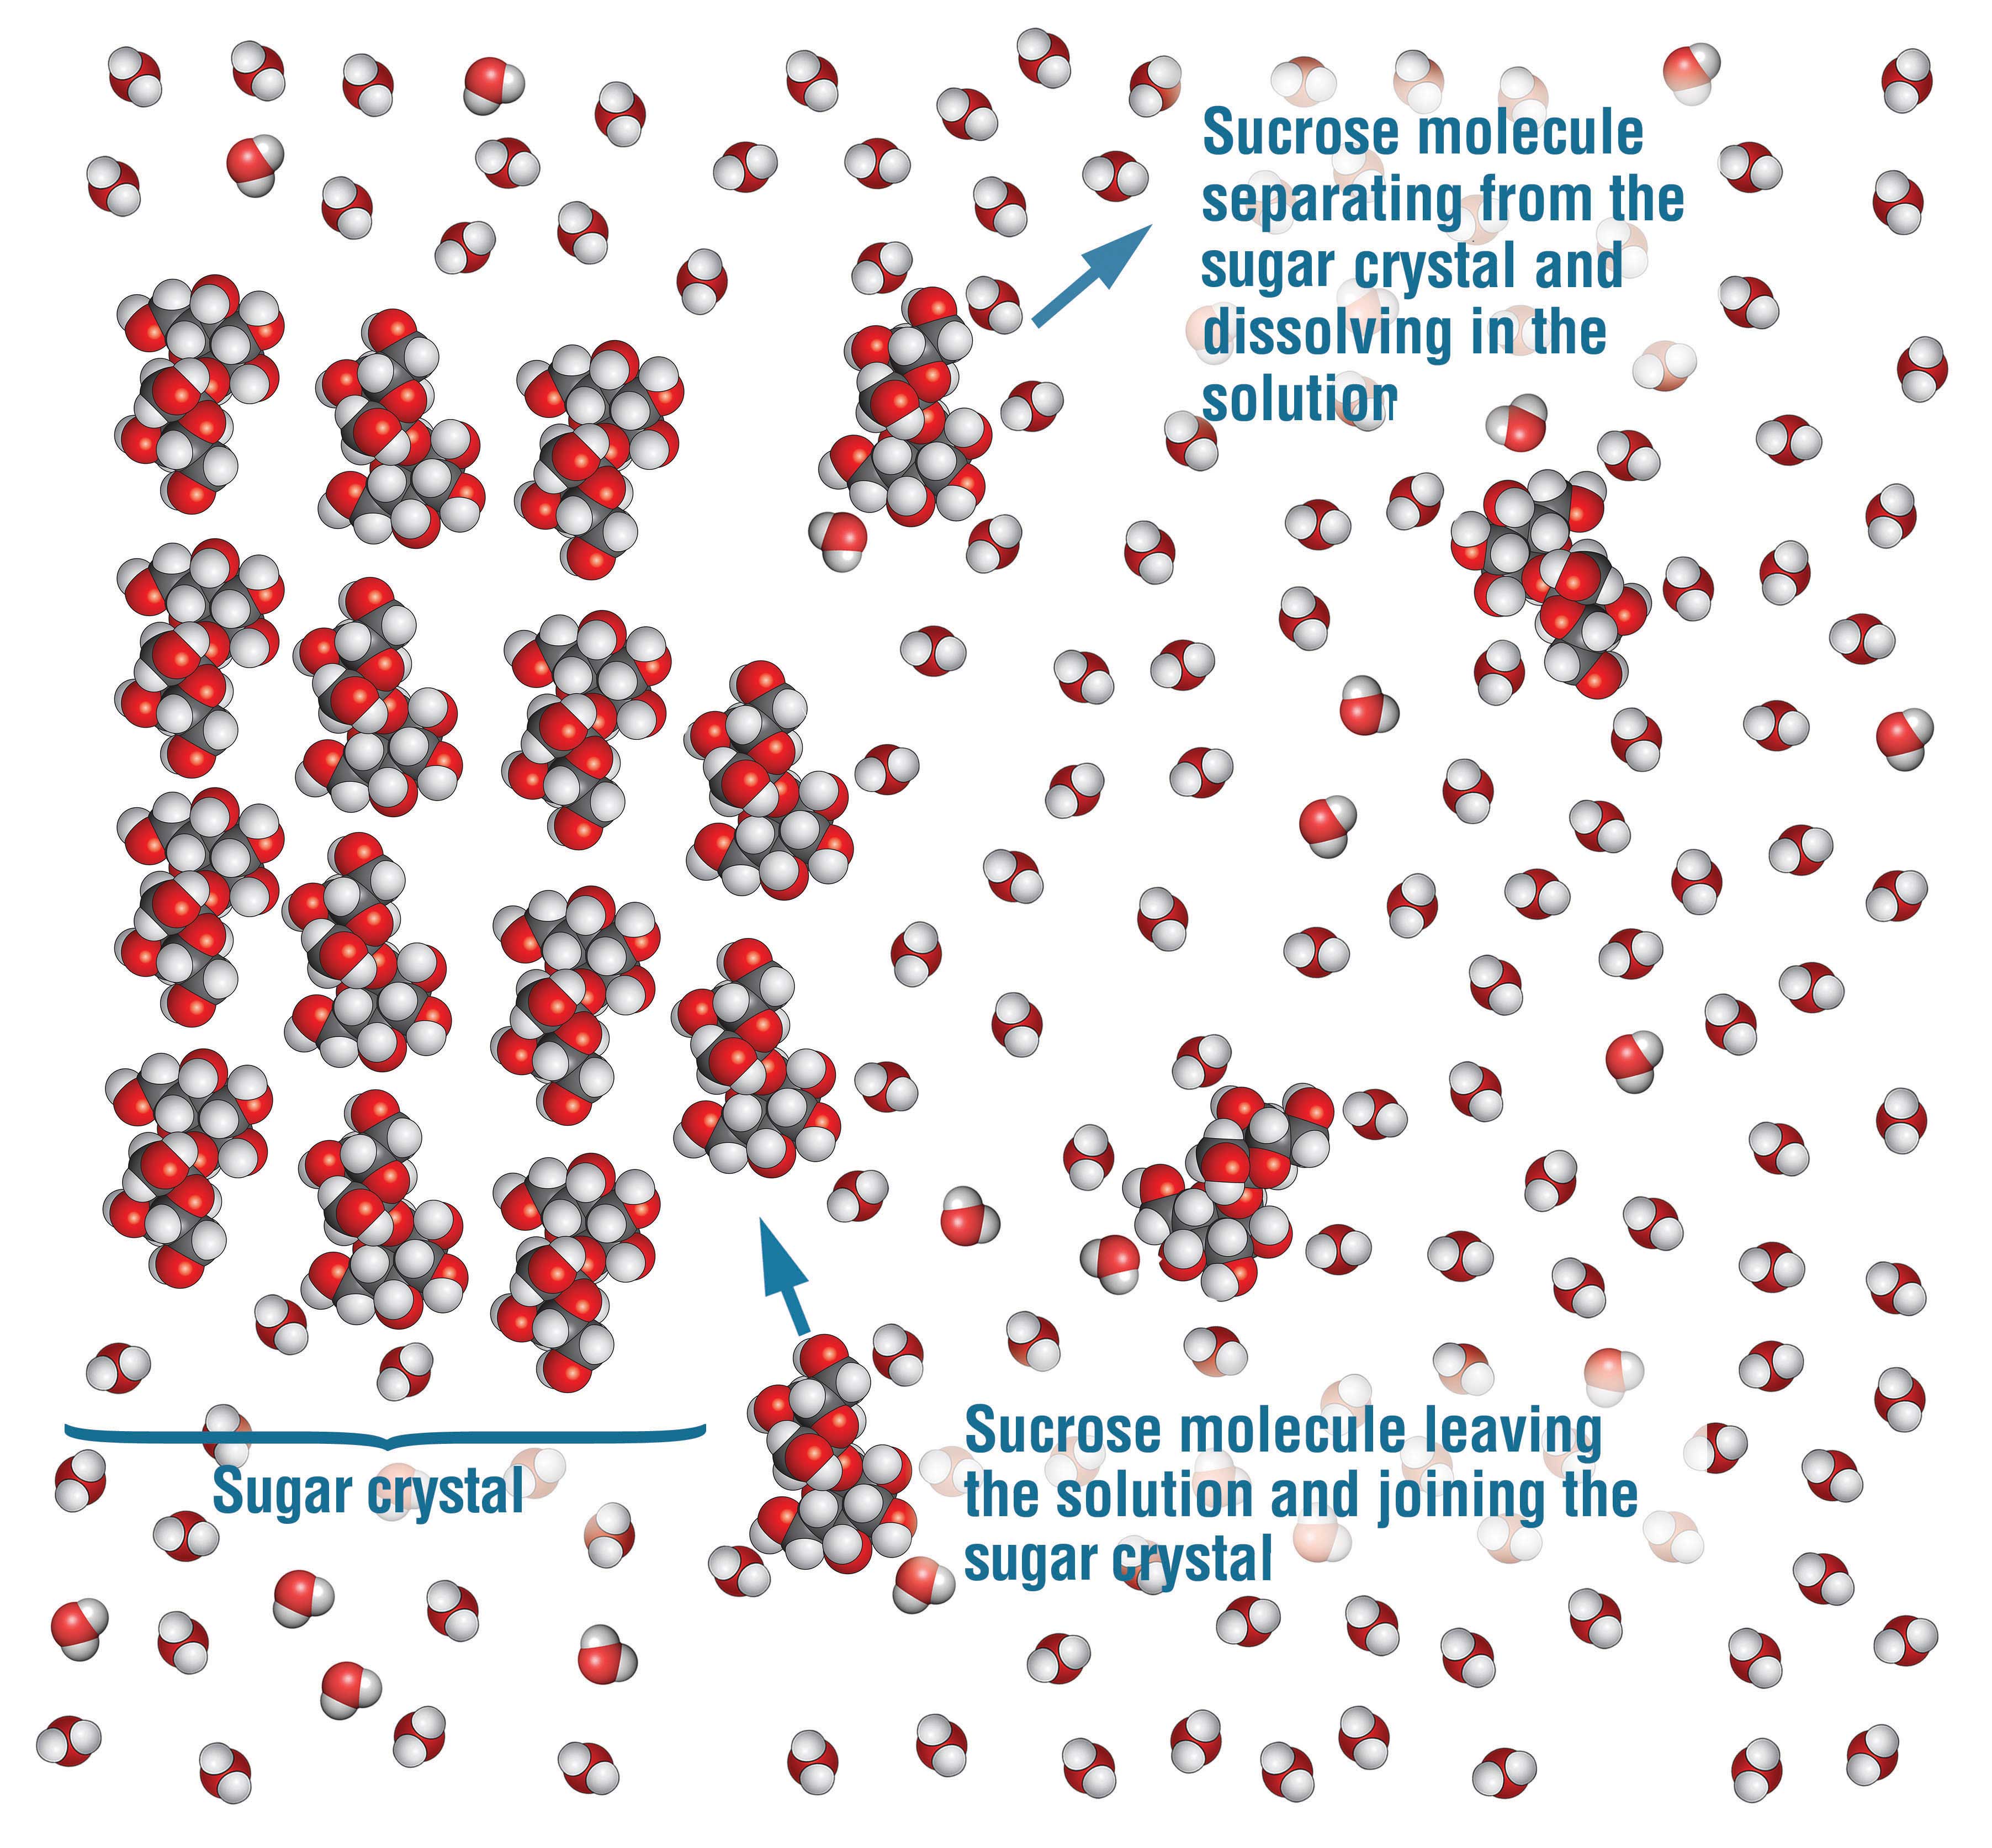
Why is that so? If you were able to see the molecules of sucrose and water, you would notice that, in the beginning, when you add a small amount of granulated sugar to the water, most of the sucrose molecules are leaving the sugar crystals, pulled away by the water molecules. You would also notice that some of the dissolved sucrose molecules are also crystallizing, that is, not only are sucrose molecules leaving the sugar crystals but other sucrose molecules are rejoining the sugar crystals, as well (Fig. 4). The reason is that sucrose molecules are constantly moving in the solution, so nothing prevents some of them from binding again to sucrose molecules in the sugar crystals. However, the rate of dissolving is greater than the rate of crystallization—at least until the solution is saturated—so, overall, the sugar crystals remain dissolved in the water.
Click image to enlarge
As we add more granulated sugar to the solution, the rate of dissolving decreases and the rate of crystallization increases, so at some point, both rates are equal. In other words, the number of sucrose molecules leaving the crystals is the same as the number of sucrose molecules joining the crystals. This is what happens when the solution is saturated.
As a result, past that point, if we add more sugar crystals, the process of dissolving will continue, but it will be exactly balanced by the process of recrystallization. So the sugar crystals cannot dissolve in the water anymore. In this case, the crystals and the solution are in dynamic equilibrium. This means that the size of the crystals stays the same, even though the sucrose molecules are constantly trading places between the solution and the crystals.
To make rock candy, we initially used more sugar than could dissolve in water at room temperature (three cups of sugar for one cup of water). The only way to get all of that sugar to dissolve is to heat up the water, because increasing the temperature causes more sugar to dissolve in water. In other words, the dynamic equilibrium is affected by a change in temperature. If we increase the temperature, we increase the dissolving process, and if we reduce the temperature, we decrease the dissolving process.
The crystallization process is explained by Le Châtelier’s principle, which states that a system that is shifted away from equilibrium acts to restore equilibrium by reacting in opposition to the shift. So an increase in temperature causes the system to decrease energy, in an attempt to bring the temperature down. Because the breakup of chemical bonds always absorbs energy, it cools the system down, so more sucrose molecules break apart and dissolve in the solution.
What happens when the solution cools down? At this point, we see sugar crystals form. This is also explained by Le Châtelier’s principle: A decrease in temperature causes a system to generate energy, in an attempt to bring the temperature up. Because the formation of chemical bonds always releases energy, more sucrose molecules will join the crystal in an attempt to increase the temperature. This explains why crystals form when the temperature decreases.
Once the saturated solution starts to cool down, it becomes supersaturated. A supersaturated solution is unstable—it contains more solute (in this case, sugar) than can stay in solution—so as the temperature decreases, the sugar comes out of the solution, forming crystals. The lower the temperature, the more molecules join the sugar crystals, and that is how rock candy is created.
Small crystals of fudge
Rock candy is made of large crystals of sugar, but other candies, such as fudge, contain smaller crystals of sugar.
Question: As the sugar syrup cools down, what can we do to ensure that only small crystals form?
Answer: Stir the syrup with a spoon or a spatula. Stirring prevents the sugar crystals that start to form from growing too big. In general, a crystal grows from a “crystal seed,” which is a clump of sucrose molecules, a speck of dust, or a gas bubble. Stirring causes the sucrose molecules to be pushed into one another, forming crystal seeds throughout the syrup. The resulting crystals will be smaller when more of the crystal seeds are present, because the sucrose molecules can join any of a larger number of crystal seeds.
If you want to make fudge, first heat the syrup to a temperature above the boiling point of water (100 oC), and then pour it into a pan to make the syrup cool down faster. The reason the syrup needs to cool quickly is that sucrose molecules do not have time to form enough intermolecular interactions to grow into large crystals. Some of them will form crystal seeds, but most of the sucrose molecules won’t interact with one another. By contrast, if the syrup were to cool slowly, the sucrose molecules would have time to arrange themselves in larger crystals.
After the syrup cools down to 50 oC, you can start stirring or scraping it. It is important to let the fudge cool down to 50 oC because if you stir during this cooling phase, crystal seeds will probably form too soon and, as a result, they may crystallize out of the solution, and the texture of the fudge would be grainy. The syrup actually becomes supersaturated, similar to what happened to the syrup used to make rock candy—the syrup contains more sucrose molecules than can stay dissolved.
As you stir the fudge, many crystals form at once, and the stirring helps the sucrose molecules bind to one another and start forming small crystals. The main goal is to keep stirring continuously, which generates a larger number of small crystals. As the temperature decreases further, the sucrose molecules spread among the many crystal seeds and bind to any one of them, keeping the size of the crystals small. This creates the rich, melt-in-the mouth texture typical of fudge.
No crystals at all
Some candies have no crystals at all. Examples of such candies include glass candy, gummies, and cotton candy.
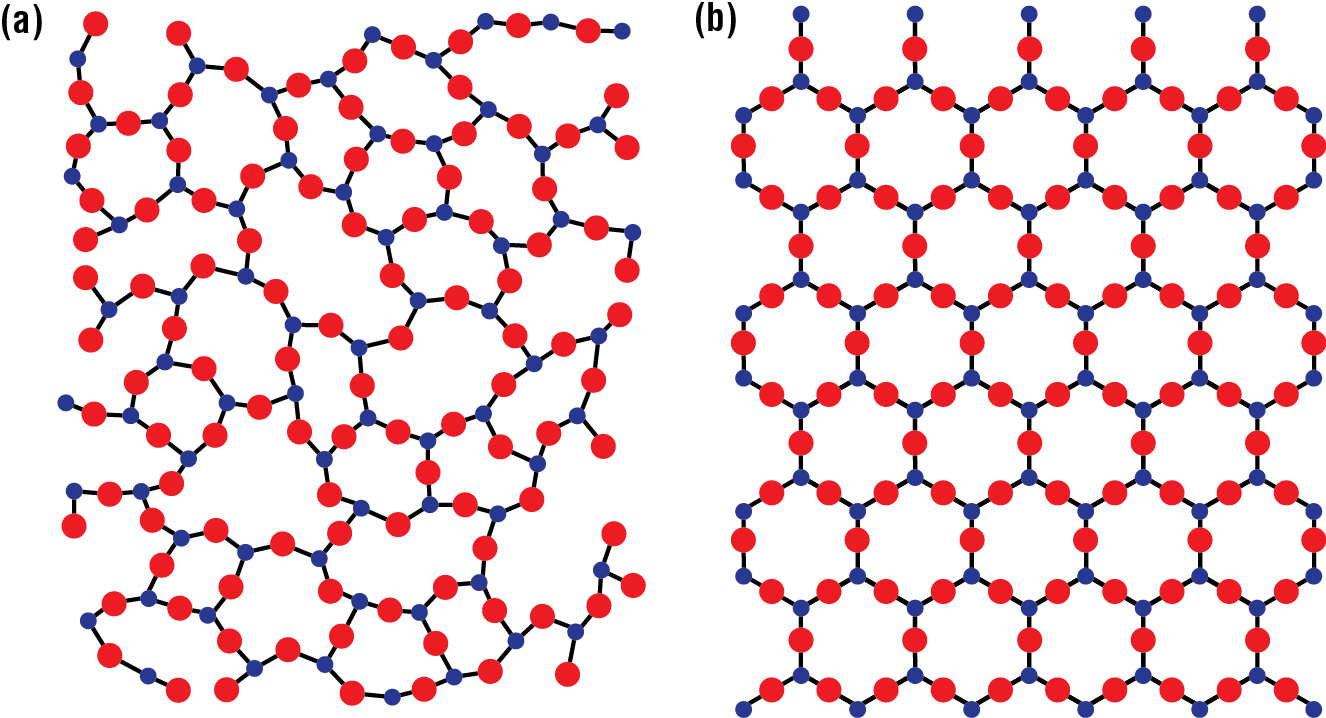
Glass candy is so-named because of its noncrystalline structure. Usually, when people use the word “glass,” they mean the transparent material used to make windows. But glass has a more general meaning: It is a solid with an amorphous structure, which is an irregular structure, with no pattern. By contrast, a crystal is a solid with a highly ordered structure. For example, Fig. 5 shows the differences between the crystal and glass structures of silicon dioxide (a molecule than has a simpler structure than sucrose and is easier to represent).
Click image to enlarge
To make glass candy, you cool the sugar syrup so rapidly that no crystals have time to form. The dissolved sucrose molecules start binding with each other, but in no particular order. When this happens, the candy is amorphous, and it is an example of a glass.
Gummies and marshmallows are produced similarly. In the case of gummies, gelatin is added to the sugar syrup to give it a rubbery consistency. Marshmallows also contain gelatin, but air is whipped into the mixture to expand it into a foam—a mixture composed of gas bubbles dispersed in a liquid.
Cotton candy is produced a little differently because the process does not start with sugar syrup. First, granulated sugar is heated in a cotton candy machine until it melts and the intermolecular forces between the sucrose molecules are broken. Having liquefied the sugar, the cotton candy machine then sprays the liquid through tiny nozzles so that it forms fine filaments of liquid that solidify immediately.
This quick cooling of the liquid into open air does not allow the sucrose molecules to form crystals, and threads of glass are created instead. These glass threads are so fine that they melt in your mouth, which is the wonderful experience of eating cotton candy.
One syrup, many candies
Most candies are made from syrup yet their texture can vary substantially. Two factors play a key role: the length of time for crystals to grow, and the way the syrup is handled while it cools down.
In the case of rock candy, the syrup is left for several days, which provides plenty of time for the formation of large crystals. In the case of fudge, because the syrup is stirred continuously, a large number of small crystals is formed. When making glass candy, gummies, or marshmallows, the syrup is cooled down so quickly that no crystals can form at all.
Making candies is actually chemistry in action. You manipulate the size of sugar crystals—even if you cannot see them—to produce an array of textures. This skill has been developed over hundreds of years, before the science of candy-making was understood. But even then, this art form tells us something interesting about chemistry: It is not only the combination of ingredients that defines a product but also the way they are mixed together


